Framing Calculator
Calculate stud count, top & bottom plate boards, linear lumber, board feet, and sheathing sheets for any wood-framed wall — with an interactive 2D layout diagram.
Input Parameters
All measurements update calculations in real-time.
✓ preview: 16' 0" (192")[Enter to confirm]
Calculated Results
Results update automatically as you change inputs.
📐Interactive 2D Wall Layout
What Is Wall Framing? A Wall Framing Calculator Primer
Before you punch numbers into a wall framing calculator, it helps to understand the parts you are counting. A wall frame is more than sticks and nails — every member has a predictable role, spacing, and count rule.
Wall framing is the structural skeleton of a wood-framed building. A typical wall is built from vertical studs spaced at regular intervals, capped by a double top plate at the ceiling and a single bottom (sole) plate at the floor. Together these members carry the roof and floor loads down to the foundation and provide a nailing surface for sheathing, drywall, and insulation.
Studs are most commonly 2×4 or 2×6 lumber placed 16 inches on-center (O.C.) for load-bearing walls, or 24 inches O.C. for non-load-bearing partitions and advanced framing (OVE) layouts. The on-center measurement means the distance from the center of one stud to the center of the next — not the gap between them — so panel edges land exactly on stud faces when spacing is matched to 4×8 sheets.
The top plate is doubled to tie the wall together and transfer loads past any single stud joint. The second layer overlaps the first by at least 4 feet at splices and wraps corners so intersecting walls share nailing. A raked (gable-end) wall replaces the flat top plate with a sloped one that follows the roof line, and each stud is cut to a different height so the top of the wall matches the pitch.
- Studs: Vertical 2×4 or 2×6 members at 16″ or 24″ O.C. that carry vertical load.
- Top plate: Doubled horizontal member at the top; laps joints and carries roof/floor loads.
- Bottom (sole) plate: Single horizontal member at the floor; pressure-treated where it sits on concrete.
- Sheathing: 4×8 OSB or plywood panels that brace the wall against racking and provide a nailing surface for cladding.
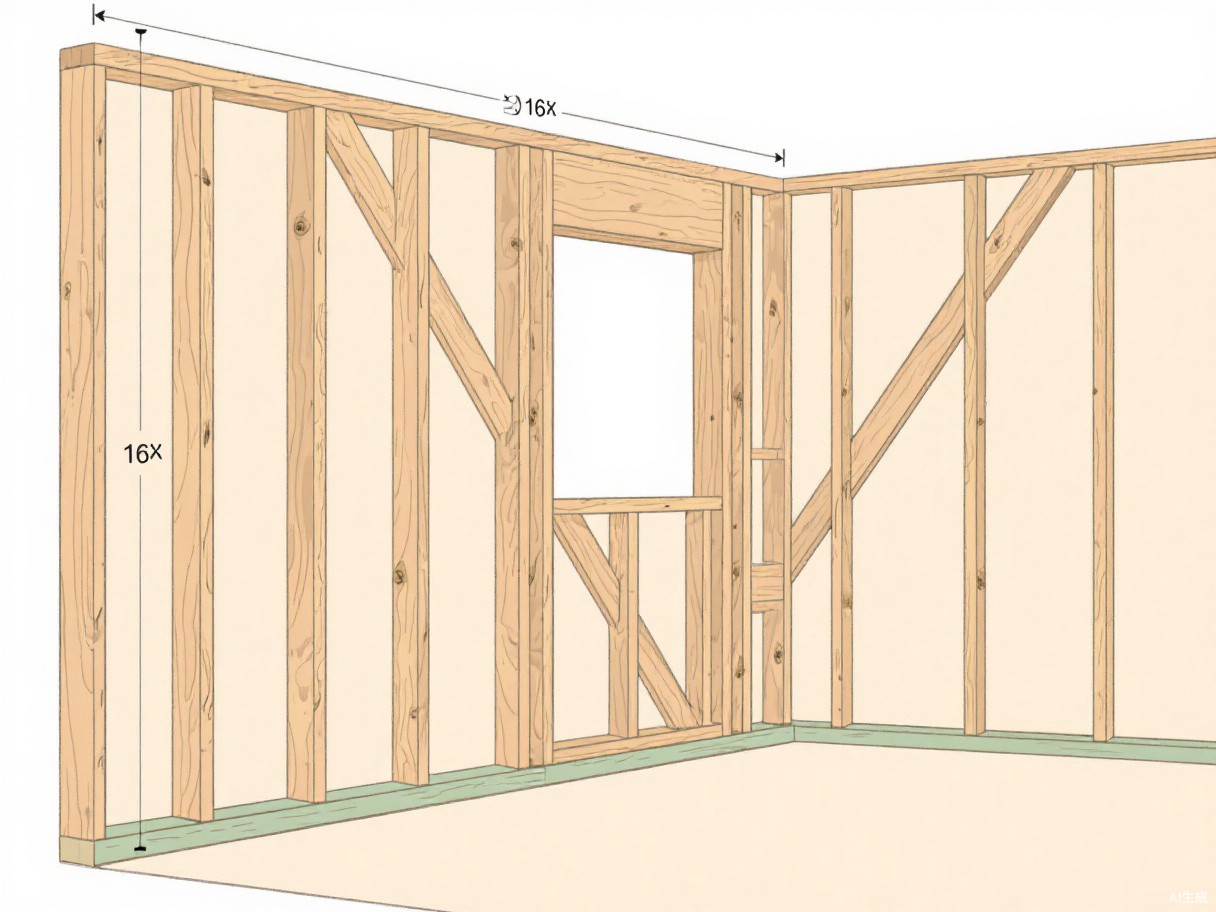
A wood-framed wall: studs, double top plate, and sole plate.
Types of Wall Studs & Framing Components — Stud Framing Calculator Guide
A good stud framing calculator needs more than field studs. Around every door and window, at every corner, and up at the plates you will find specialized members with different names, lengths, and jobs. Understanding each one lets you verify the takeoff before the nail gun starts firing and spot where a stud framing calculator is most useful.
Field (Common) Stud
Full-height vertical member spaced at regular on-center intervals (16″, 19.2″, or 24″ O.C.) between the sole plate and the top plate.
When it shows up: The bulk of any framed wall; field studs carry vertical loads and provide nailing for sheathing and drywall.
King Stud
Full-height stud running floor to ceiling on each side of a door or window opening. The king stud is continuous and is not interrupted by the header.
When it shows up: Frames the outside of every rough opening; the jack (trimmer) stud nails against it to support the header.
Jack Stud (Trimmer Stud)
Shorter stud that sits on the bottom plate and supports the end of the header on each side of an opening. Height = header bottom to sole plate.
When it shows up: Load-bearing member under each header end. Most openings need two jack studs minimum; wide spans get doubled or tripled trimmers.
Cripple Stud
Short stud that fills the space above a header down to the top plate, or below a window rough sill down to the sole plate.
When it shows up: Header cripples keep the top-plate layout continuous; sill cripples support the window rough sill from below.
Header
Beam spanning the top of a door or window opening, transferring loads above the opening down to the jack studs on each side.
When it shows up: Sizes are set by span and load per IRC Table R602.7. Typical 3′ openings use a double 2×12 or built-up LVL header.
Rough Sill
Horizontal member at the bottom of a window opening, running between the jack studs and supported by sill cripples.
When it shows up: Provides a flat nailing base for the window unit; not needed for doors.
Bottom (Sole) Plate
Single horizontal 2× member anchored to the floor slab or subfloor; studs toenail or face-nail into it.
When it shows up: Use pressure-treated PT lumber where the plate sits on concrete or masonry to resist wicking moisture.
Double Top Plate
Two stacked horizontal 2× members capping the studs. The second layer laps joints by ≥ 4 ft and ties intersecting walls together.
When it shows up: Standard on all exterior and load-bearing walls. Non-load-bearing partitions may use a single top plate if code allows (advanced framing / OVE).
Anatomy of a Framed Wall
Each part of a framed wall has a predictable position and count rule. Use this cheat sheet to sanity-check the framing calculator output and to know what to order beyond raw field studs.
| Part | What It Is | Count Rule |
|---|---|---|
| Field Studs | Vertical members between plates | 1 every 16″ / 19.2″ / 24″ O.C. + 1 end stud per wall run |
| Bottom Plate (Sole) | Horizontal member on the floor, same width as studs | 1 × total wall-run length |
| Top Plate | Doubled on bearing walls; single on partitions (OVE) | 2 × wall length (bearing) or 1 × (partition) |
| King Studs | Full-height studs flanking each rough opening | 2 per opening (one each side) |
| Jack (Trimmer) Studs | Shorter studs under each header end; carry header load | 2 per opening minimum; doubled/tripled for wide or heavy spans |
| Header | Built-up beam spanning each door/window opening | 1 per opening; size = function of clear span + load above (per IRC R602.7) |
| Rough Sill + Sill Cripples | Window-only: bottom beam + short studs below it | 1 sill + 2–4 sill cripples per window |
| Corner Post (3-Stud) | Built-up 3-stud L at each exterior 90° corner | + 3 studs per exterior corner; advanced-framing corners use 2 studs + clips |
| T-Wall Intersection Backing | Nailer or studs where a partition meets a main wall | + 2 studs per T-intersection (ladder blocking or California style) |
| Blocking / Fire Stop | Short pieces mid-bay at mid-height in some jurisdictions | Per local code; ~ 1 piece per stud bay (allow 5–8% of stud count) |
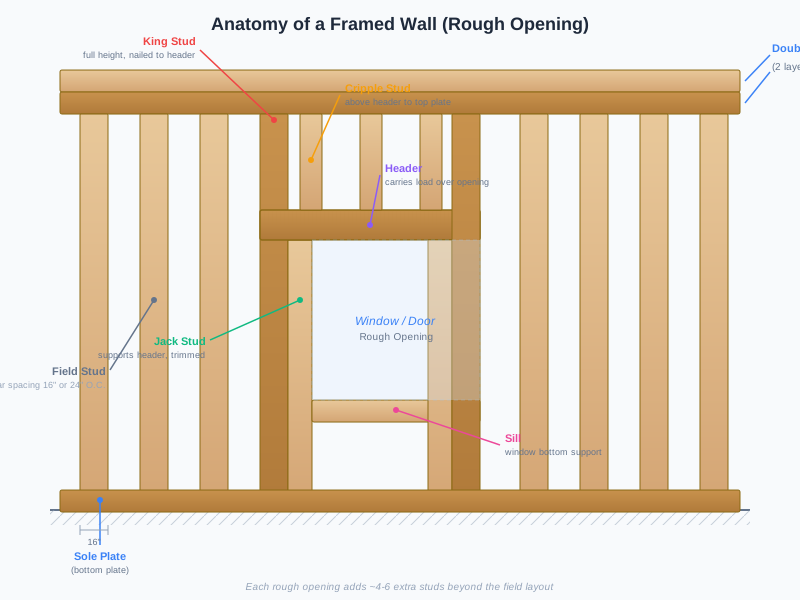
A rough opening shows kings, jacks, and a header; openings add framing rather than simply removing studs.
Lumber Size Reference Table
Dimensional lumber is sold by its nominal size, but the actual dimensions are smaller after drying and surfacing. Board-foot calculations use the nominal size; the 2D diagram uses the actual size.
| Nominal | Actual Thickness | Actual Width | Common Use |
|---|---|---|---|
| 2" × 4" | 3½" | 1½" | Standard wall studs, plates, blocking |
| 2" × 6" | 5½" | 1½" | Exterior walls, tall walls, insulated cavities |
| 2" × 8" | 7¼" | 1½" | Headers, rafters, floor joists |
| 2" × 10" | 9¼" | 1½" | Floor joists, beams, headers |
| 2" × 12" | 11¼" | 1½" | Long-span beams, stair stringers |
Pre-Cut Stud Lengths
| Nominal Wall Height | Pre-Cut Stud Length | Actual Wall Height |
|---|---|---|
| 8 ft | 92⅝" | 97⅛" (stud + double top plate + bottom plate) |
| 9 ft | 104⅝" | 109⅛" |
| 10 ft | 116⅝" | 121⅛" |
Board Feet by Common Stock Size
Use these to convert linear-foot orders into the board-foot (BF) volume that lumber yards and bulk bids quote. Formula: BF = (nominalW × nominalT ÷ 12) × length_ft.
| Nominal Size | 8 ft | 10 ft | 12 ft | 16 ft |
|---|---|---|---|---|
| 2×4 | 5.33 BF | 6.67 BF | 8.00 BF | 10.67 BF |
| 2×6 | 8.00 BF | 10.00 BF | 12.00 BF | 16.00 BF |
| 2×8 | 10.67 BF | 13.33 BF | 16.00 BF | 21.33 BF |
| 2×10 | 13.33 BF | 16.67 BF | 20.00 BF | 26.67 BF |
| 2×12 | 16.00 BF | 20.00 BF | 24.00 BF | 32.00 BF |
Common Stud Spacing Guide
| Application | Typical Spacing | Stud Size | Notes |
|---|---|---|---|
| Interior partition walls (non-load-bearing) | 24" O.C. | 2x4 | Allowed by most codes when not carrying roof or floor loads. 24" O.C. saves ~33% lumber vs 16". |
| Exterior load-bearing walls | 16" O.C. | 2x4 or 2x6 | Standard for most residential construction. 16" O.C. aligns with 4×8 sheathing edges. |
| Tall walls (over 10 ft) | 16" O.C. | 2x6 | Taller studs buckle more easily; 2x6 at 16" O.C. resists wind and axial loads. |
| Basement / foundation walls | 16" O.C. | 2x4 | Standard for insulated basement finishes. Pressure-treated bottom plate required. |
| Gable end walls | 16" O.C. | 2x4 | Raked top plate follows roof slope; stud heights vary along the wall. |
How to Calculate Stud Spacing
If you need to know how to calculate stud spacing for a wall, start with the typical values in the table above, then confirm the layout works with your sheathing. The basic rule for how to calculate framing stud spacing is: number of spaces = round(wall length ÷ on-center spacing), and number of studs = spaces + 1. For a 10 ft wall at 16″ O.C. that is round(120 ÷ 16) = 8 spaces, so 9 studs minimum.
When people ask how to calculate studs per foot, the answer depends on spacing: 16″ O.C. gives 0.75 studs per foot (1 stud every 1.333 ft), while 24″ O.C. gives 0.5 studs per foot. Multiply by your wall length and add end studs, corners, and openings. The framing calculator above handles this automatically — just enter the wall length and pick 16″ or 24″ O.C.
Field Studs by Wall Length & Spacing
Base count only — no openings, no corners, no waste. Add corner/opening framing separately, then apply a 10–25% waste factor. Plate footage shown assumes a full wall of that exact length (no rounding up to stock lengths).
| Wall Length | 16″ O.C. Studs | 24″ O.C. Studs | Double Top Plate (ln ft) | Single Top Plate (ln ft) |
|---|---|---|---|---|
| 8 ft | 7 | 5 | 16 | 8 |
| 10 ft | 9 | 6 | 20 | 10 |
| 12 ft | 10 | 7 | 24 | 12 |
| 16 ft | 13 | 9 | 32 | 16 |
| 20 ft | 16 | 11 | 40 | 20 |
| 24 ft | 19 | 13 | 48 | 24 |
| 28 ft | 22 | 15 | 56 | 28 |
| 32 ft | 25 | 17 | 64 | 32 |
| 40 ft | 31 | 21 | 80 | 40 |
| 50 ft | 38 | 26 | 100 | 50 |
Extra Studs Needed per Opening & Corner
These are the incremental pieces you add on top of the field-stud count in the table above. The old “subtract studs for the opening width” shortcut is wrong — openings actually add members because of king, jack, header, and cripple framing.
| Feature | Width (typical) | Studs Added | Notes |
|---|---|---|---|
| Standard Interior Door | 2′8″–3′0″ | 4–5 | King + trimmer each side + 1 header. 5 includes one header-cripple pair when door is set below plate line. |
| Wide Door / Patio Slider | 5′0″–6′0″ | 6–7 | Larger header (double LVL common), doubled trimmers on each side, king studs unchanged. |
| Single Hung Window | 2′0″–3′0″ | 5–6 | King + trimmer each side, 1 header, 1 rough sill, 2–4 sill cripples below. |
| Large Picture Window | 4′0″–6′0″ | 7–9 | Bigger header, more sill cripples, sometimes extra kings to distribute heavy glass loads. |
| 90° Exterior Corner (Traditional) | — | 3 | Two studs form the L; a third backs the drywall nailing on the interior return. |
| 90° Corner (Advanced / OVE) | — | 2 | Two-stud corner with drywall clips or a nailer strip; leaves cavity open for insulation. |
| T-Wall Intersection | — | 2–3 | Ladder blocking or California-style nailer studs so both walls get a solid drywall edge. |
Comparing 12″, 16″, 19.2″ & 24″ On-Center Spacing
Spacing controls how many studs you buy and how well 4-ft panel edges line up with a stud behind them. 19.2″ O.C. is the production-builder secret that saves 20% of your stud lumber while still landing every sheet joint on a stud.
12″ O.C.
Closest common spacing. Divides a 4-ft sheet into 4 equal bays of 12″ each. Maximum rigidity and drywall screw-backing.
Best used for: Heavy-load walls, tile backers, tall (12-ft+) non-bearing walls, or when the client asks for a “stiff” partition feel.
Panel hit: Every panel edge always lands on a stud; every 4th bay center also hits a sheet joint.
16″ O.C.
The default load-bearing spacing. Three bays per 4-ft sheet (16 × 3 = 48). Stud count is the baseline for most bid takeoffs.
Best used for: Exterior walls, load-bearing partitions, any wall receiving tile or stone finishes, IRC Table R602.3.1 general case.
Panel hit: Every panel edge and every 4-ft sheet break lands perfectly on a stud center.
19.2″ O.C.
A mid-point spacing that puts exactly 5 studs over two 4-ft sheets. Saves 20% lumber vs 16″ O.C. while still landing a stud at every sheet joint.
Best used for: Single-story, non-bearing, or upper-story walls where 24″ feels too sparse but 16″ feels wasteful; very common with production builders on large developments.
Panel hit: Sheet breaks at 4′, 8′, 12′, 16′ all land on stud centers — the 5th stud every 8 ft is key to the math.
24″ O.C.
Two bays per 4-ft sheet (24 × 2 = 48). About 33% fewer studs than 16″ O.C.; typically paired with 2×6 lumber to maintain buckling resistance.
Best used for: Non-load-bearing interior partitions, exterior advanced-framing (OVE) walls with 2×6 studs, single-story homes in mild wind zones.
Panel hit: Every 4-ft sheet edge lands on a stud; field joints (mid-panel) do NOT. Requires edge nailing schedules from the drywall spec.
How to Calculate Framing Needs with a Wood Framing Calculator
Figuring out how much lumber you need for a wall comes down to five steps: measure the wall, pick the spacing, count the studs, estimate the plates, and add sheathing. A wood framing calculator handles the math automatically, but understanding the process behind a wood framing calculator helps you verify the results and catch mistakes before you order.
Measure the wall length
Measure the total horizontal run of the wall in feet. The calculator converts this to inches internally so stud spacing (16" or 24" O.C.) divides evenly.
Pick the stud spacing
16" O.C. is standard for load-bearing walls and aligns with 4×8 panel edges. 24" O.C. is permitted for non-load-bearing partitions and saves roughly one-third of the studs.
Count the vertical studs
Stud count = round(wall length ÷ spacing) + 1, then add extra studs for corners, intersections, and double end studs. Each opening (door/window) also adds jack, king, and cripple studs.
Estimate top and bottom plates
The top plate is doubled for strength, so total top-plate lumber = 2 × wall length. The bottom (sole) plate is single. Divide each by the stock board length (8/10/12/16 ft) and round up for the purchase count.
Add sheathing (advanced)
Full sheets = floor(wall length ÷ sheet width). The leftover run becomes a rip-cut sheet — the calculator returns its exact width as a fractional inch cut.
How to Calculate Studs, Plates & Sheathing for a Wall
If you are wondering how to calculate framing for a wall, the calculator above does the math automatically — but it helps to know what is happening behind the scenes. Whether you need to know how to calculate how many studs you need for a 12 foot wall or how to calculate lumber for a whole house, the process is the same: measure the wall length, divide by the stud spacing, add one for the end, and add extras for corners and openings.
How to calculate studs for a wall: stud count = round(wall length × 12 ÷ spacing) + 1, then add extra studs for each corner, intersection, and door or window opening. For a 12 ft wall at 16″ O.C.: round(144 ÷ 16) + 1 = 10 studs, plus any extras. This is the core of any wall stud calculator.
How to calculate top and bottom plate boards: the top plate is doubled, so total top-plate length = 2 × wall length. The bottom plate is single. Divide each by your stock board length (8, 10, 12, or 16 ft) and round up. For a 20 ft wall with 8 ft boards: top plate = ceil(40 ÷ 8) = 5 boards, bottom plate = ceil(20 ÷ 8) = 3 boards.
How to calculate board feet for framing: board feet = (nominal width × nominal thickness × length in feet) ÷ 12. A 2×4 has a factor of (2 × 4) ÷ 12 = 0.667 BF per foot. Multiply by the total linear feet of studs and plates. This is how lumberyards price dimension lumber and how the calculator reports total board feet.
How to calculate sheathing for a wall: full sheets = floor(wall length ÷ sheet width), where sheet width is the panel dimension along the wall (4 or 8 ft). The remainder becomes a rip-cut sheet — for a 26 ft wall at 4 ft sheets that is 6 full sheets plus a 24″ cut. The advanced mode of the calculator returns the exact cut width as a fractional inch.
How Much Waste to Add
Ordering the exact stud count from the calculator is the fastest way to run short on a lift. Use 10% as the floor and scale up based on layout complexity. These are the same allowances estimators at production builders rely on.
Single straight run with one or zero doors, no jogs, and standard stud length. Good for partition walls in open plans.
The industry default. Covers culled boards, crowned studs, the occasional mis-cut, cut-offs around openings, and blocking/fire-stop pieces.
Walls with two or more windows + a door, or plans with frequent jogs, bay windows, or 45° breaks. Also use 20% for rake/gable-end walls where every stud gets a custom angle cut.
Curved walls, eyebrow arches, complex header details, balloon framing, or when you are self-performing first-time framing and expect some practice waste.
Tips for Accurate Framing Takeoffs
Add 10–15% waste to stud counts for cuts, culls, and mis-nails. The O.C. layout count is the minimum; real orders round up.
Lap top plate joints at least 4 ft and offset the two plate layers so no two joints fall on the same stud bay.
Use pressure-treated lumber for the bottom plate on concrete — it resists moisture wicking through the foundation.
For 9 ft or taller walls, order pre-cut "stud length" lumber (104⅝", 116⅝") to avoid cutting every stud on site.
Sheathing layout works best when stud spacing matches panel edges. 16" O.C. with 4-ft sheets lands every fourth stud on a sheet break.
Corners and intersections need 2–3 studs built up as a post so both walls have nailing surface. Account for these in the extra-end-stud count.
How This Framing Calculator App Computes Your Layout
Behind every result from this framing calculator app is a set of straightforward formulas. Understanding how the framing calculator app computes the numbers helps you sanity-check results and adjust inputs for unusual layouts. Here are the core calculations the tool runs for every wall.
studs = round(L_ft × 12 ÷ spacing_in) + 1 + extraEndStudsL is wall length in feet. "round" snaps the layout to whole spacing increments so studs land on exact O.C. marks. Extra end studs cover corners and double-stud ends.
boards = ceil(2 × L_ft × rakeFactor ÷ boardLength_ft)Top plate is doubled. rakeFactor = 1 ÷ cos(rakeAngle) lengthens the top plate on a raked (gable) wall. Stock board length is 8, 10, 12, or 16 ft.
boards = ceil(L_ft ÷ boardLength_ft)Bottom (sole) plate is single. No rake factor — the sole plate is always horizontal.
linear = topPlate + bottomPlate + (studs × avgStudHeight)Sum of all plate and stud linear footage. On a raked wall the average stud height = base height + (wall length × tan(rake)) ÷ 2.
BF = (nominalW × nominalT ÷ 12) × linear_ftBoard foot uses nominal dimensions (e.g. 2 × 4 = 8). For a 2x4 the factor is 0.667 BF per linear foot. Multiply by total linear feet for the wall.
full = floor(L_ft ÷ sheetWidth_ft); cut = (L_ft mod sheetWidth) × 12Sheet width is the panel dimension running along the wall (4' or 8'). The remainder is converted to inches and shown as a fractional rip-cut.
Framing Material Calculation Example
Walk through a worked example to see how the inputs flow into a final material order. This sample uses a 100 ft wall at 16″ O.C. with 8 ft boards — the same defaults the calculator loads.
Add a 10–15% waste allowance on top of the calculated studs to cover cuts, culls, and mis-nails. Order plate boards in the longest practical length to minimize lap joints.
One Tool, Many Names: Stud Calculator, Framing Estimator & More
Builders, homeowners, and estimators search for this tool under dozens of different names — stud calculator, framing calculator, wall calculator, contractor calculator, lumber estimator. They all describe the same job: turn wall dimensions into a lumber order you can trust. Here is a map of the most common terms and what each one emphasizes, so you know exactly which feature above answers your question.
Stud Calculator, Wall Stud Calculator & Stud Wall Calculator
A stud calculator (also called a wall stud calculator, stud wall calculator, or framing stud calculator) answers the most fundamental framing question: how many vertical studs does this wall need? The core formula is round(wall length ÷ on-center spacing) + 1, then add extras for corners, intersections, and openings. This page works as a stud calculator for wall segments of any length — whether you need a stud calculator for walls in a single room or an entire house. As a stud calculator for framing, it also breaks the total into field studs vs. end studs so you can verify where corners are already counted. Enter the wall length, pick 16″ or 24″ O.C., and the Calculated Results panel tells you exactly how many studs to order. To calculate studs through a stud wall framing calculator workflow, the same inputs also drive the plate, sheathing, and board-foot outputs — so you get a full wall takeoff, not just a stud count.
Wall Calculator, Frame Calculator & Wall Builder
Wall calculator, frame calculator, and wall builder are broader terms that homeowners and DIYers use when they are not sure of the exact industry name. All three refer to a tool that takes wall parameters — length, height, stud size, spacing — and returns a buildable material list. Whether you searched for a wall calculator, a frame calculator, or a wall builder, you are in the right place: the inputs above cover wall length, stud nominal size (2×4 or 2×6), on-center spacing, plate board length, and sheathing width, and the outputs are exactly what you need to place a lumber order or hand off to a framer.
Construction Calculator & Contractor Calculator
A construction calculator is a general-purpose tool that builders carry for unit conversions, stair layouts, rafter angles, and material takeoffs. This framing-focused page serves as a construction calculator for the wall-framing portion of any project — it handles feet-and-inches input, on-center spacing math, and board-foot pricing without a separate app. As a construction calculator online it runs in any browser with no download; as a construction calculator free of charge it requires no account or sign-up. Contractors who need a contractor calculator for quick wall takeoffs on the jobsite can bookmark this page — it works as a contractorcalculator (one word, same tool) on any smartphone or tablet. For broader construction framing calculator needs that go beyond walls — such as roof rafters or floor joists — pair this tool with a dedicated rafter or joist span calculator.
Lumber Estimator, Framing Estimator & Framing Material Calculator
A lumber estimator or framing estimator focuses on material quantities — how many studs, how many plates, how many sheathing sheets, how many board feet. This is exactly what the Calculated Results panel above returns. As a framing material calculator it outputs total linear lumber and board-foot volume so you can price the order at the lumber yard. A framing lumber calculator narrows the same logic to lumber-only quantities (studs plus plates, excluding sheathing), while a lumber calculator framing query and a wall stud estimator both point to the same stud-count output. Toggle the Advanced Settings to see plate boards and sheathing alongside the stud count, then multiply by the per-board price from the Lumber Price Guide below to get a rough material budget.
Framing Designer
A framing designer tool helps you visualize the wall layout before cutting lumber. The 2D diagram above acts as a framing designer — it renders every stud position, plate seam, and sheathing edge to scale so you can verify the layout against your plans before the first cut. Adjust the wall length or spacing and the diagram redraws instantly, making it easy to spot where a stud lands on a window rough opening or where a sheathing seam falls mid-bay.
Building Materials Calculator & Material List Takeoff
A building materials calculator (also searched as a building materials estimator or building material list calculator) answers the wider question behind every stud count: how much material do I need? For wall framing the answer is a five-line list — studs, plates, sheathing sheets, fasteners, and a waste allowance — and the Calculated Results panel above generates exactly that list for each wall run. As a material estimator it also returns board-foot volume so you can price the order, and the PDF export turns the on-screen list into a hand-off sheet. Run it once per wall segment, sum the results, and you have the same takeoff a materials estimator would charge to produce.
Wall Area Calculator for Sheathing & Drywall
A wall area calculator converts length × height into the sheet count needed to close a wall in — gross square footage minus openings, divided by 32 ft² per standard 4×8 panel. The twist this page handles that bare-area math misses: sheet edges must break on stud centers, so the real-world answer depends on the layout, not just the division. Enable Draw Sheathing in Advanced Settings and the interactive diagram renders every panel with its exact rip-cut width, which is why the output beats dividing numbers into a generic area calculator.
Free Framing Calculator, Free Online & Free Forever
Every capability on this page runs as a free framing calculator — no account, no paywall, no calculation limits — and the specialized companions on the calculators hub extend the same free model to cost rollups, steel-stud pricing, deck joists, rafter cuts, and fastener counts. Whether you arrived through a free online construction calculator search or landed here comparing paid estimating apps, the whole tool family works offline-ready in any mobile browser and keeps its formulas documented on-screen, so the price of admission never hides in a subscription.
Framing Lumber Price Guide (2026)
Lumber is one of the most volatile building materials — the wholesale composite swung between roughly $400 and $900 per thousand board feet across 2025 and 2026, and regional premiums of 20–40% are normal. Use these as planning ranges and get a live local quote on bid day. For the full per-size price matrix and channel comparison, see the dedicated 2026 Framing Lumber Price List.
Typical Costs (2026 U.S. Market)
| Item | Typical Cost | Use |
|---|---|---|
| 2×4×8 Stud (SPF #2, precut 92⅝″) | $4 – $8 each | Standard 8-ft interior & exterior walls |
| 2×6×8 Stud (precut 92⅝″) | $7 – $13 each | Exterior walls needing deeper insulation cavity |
| 2×4, per linear foot | $0.45 – $0.65 / ln ft | Plate stock, blocking, short leads |
| 2×6, per linear foot | $0.80 – $1.15 / ln ft | Rafters, headers, 2×6 exterior plates |
| Framing lumber, per board foot | $0.65 – $0.95 / BF | Wholesale composite; bulk bid pricing |
| Bundle (208 pcs 8-ft 2×4) | $800 – $1,500 | Full-yard bundle saves 15–25% vs rack pricing |
| Installed framing (whole structure) | $7 – $16 / ft² of floor | Labor + materials, walls + floors + roof |
Need the full 2026 price picture?
The dedicated Framing Lumber Price List page carries the complete matrix: 2×4–2×10 pricing across 8–16 ft lengths, SPF vs SYP vs Douglas fir species multipliers, #2 vs #3 vs Prime grade premiums, and a Home Depot vs Lowe's vs local lumber yard total-cost comparison — delivery fees, break-pack premiums and returns included. A quantity × price cost block totals your order in seconds.
2×4 vs. 2×6 Walls: Which Should You Frame?
The choice is rarely about “which is stronger” — both are code-compliant when matched to the right spacing and height. It is about how much insulation cavity you need, whether plumbing has to run in the exterior wall, and which climate zone you build in.
| Dimension | 2×4 Wall | 2×6 Wall |
|---|---|---|
| Actual cavity depth | 3½″ (nominal 2×4 = 1½″ × 3½″) | 5½″ (nominal 2×6 = 1½″ × 5½″) |
| Typical spacing | 16″ O.C. (standard, some non-bearing 24″) | 16″ O.C. or 24″ O.C. (most exterior 24″) |
| Insulation R-value (fiberglass batt) | R-13 to R-15 (climate zones 1–4) | R-19 to R-21 (climate zones 5–8) |
| Lumber cost premium | Baseline (1.0×) | +30% to +40% in stud & plate lumber |
| Plumbing runs in exterior wall | Possible with 1½″ PEX but very tight; often requires furred-out drywall | Plenty of room for ½″ copper, PEX, and drain lines without furring |
| Wind & axial buckling resistance | Adequate up to 10-ft heights, 16″ O.C. | Stiffer for tall walls (10–12 ft) and high-wind zones |
| Energy payback | Best in mild climates where heating/cooling loads are low | Typically pays back lumber premium in 5–10 years in climate zones 5+ |
☀️ Good: 2×4 When…
- Climate zones 1–4 (mild heating/cooling loads)
- Interior load-bearing partitions only
- No plumbing planned inside exterior walls
- Tight lumber budget; minimum 33% saved vs. 2×6
❄️ Better: 2×6 When…
- Climate zones 5+; deeper R-19 / R-21 cavity
- Plumbing needs to run inside exterior walls
- High-wind or tall-wall (10–12 ft) applications
- Long hold; expect 5–10 year energy payback
Sheathing & Sheet Goods Reference
| Panel | Size | Along-Wall Option | Typical Use |
|---|---|---|---|
| Standard OSB / plywood | 4' × 8' | 4" or 8" (Sheet Width) | Exterior wall sheathing, structural bracing |
| Standard gypsum board | 4' × 8' | 4" or 8" (Sheet Width) | Interior wall finish |
| Tall wall sheathing | 4' × 9' or 4' × 10' | 4" (Sheet Width) | Single-sheet coverage for 9–10 ft walls |
How to Frame Corners & T-Intersections
Corners and T-wall intersections are where a takeoff is most likely to miss studs. They are also where you either block insulation (traditional 3-stud) or keep the cavity open (advanced framing / OVE). Pick a detail and keep it consistent across the plan.
Traditional 3-Stud Corner
3 studs per exterior 90°Two studs form the L by nailing through the end of one into the face of the other. A third stud is toenailed in the interior return so drywall has a solid nailing edge on both faces.
Pro: universal, code-accepted, maximum drywall backing. Con: blocks insulation in one stud cavity, loses ~1 ft of R-value per corner; uses one more stud than advanced.
Advanced 2-Stud Corner (OVE)
2 studs + drywall clips / nailer stripOnly two studs form the L, and a 1×3 or 1×4 nailer is screwed midway to back the interior drywall joint. Drywall clips are an alternative to a wood nailer.
Pro: saves 1 stud per corner; both adjacent cavities stay open for full insulation depth. Con: requires planning nailer locations; not as common with crews trained on traditional 3-stud.
California T-Intersection (Ladder Blocking)
2 studs + ladder blocksWhere a partition meets a main wall, short 2× blocks are laid flat between two main-wall studs at 12″, 48″, and 84″ heights so the partition top plate and drywall have nailing.
Pro: keeps insulation cavities continuous through the main wall. Con: ladder-block layout must be marked before sheathing is applied.
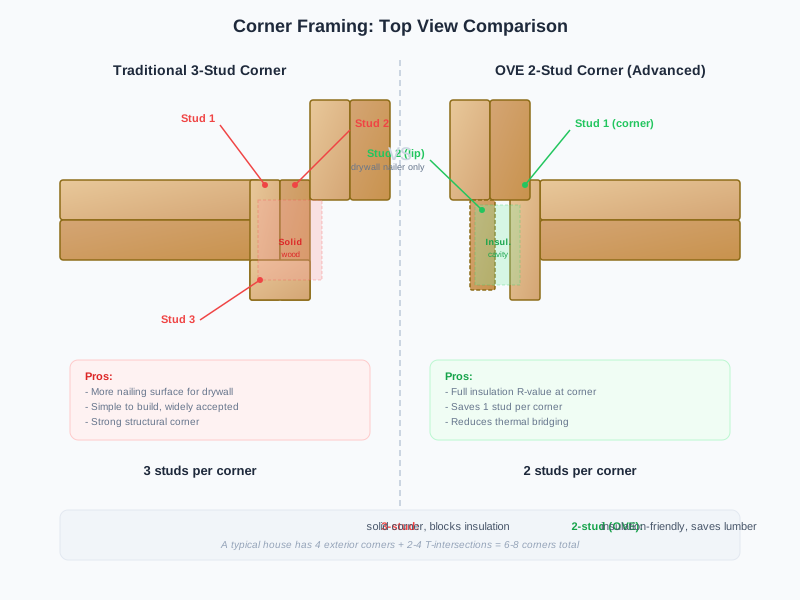
Three-stud corners block one cavity with solid wood; two-stud corners preserve insulation R-value across the full run.
Quick Takeoff Add-Up Example
Code Highlights for Wood Wall Framing
Planning-grade estimates are not code review. These are the sections your inspector will check most often on a framed wall. Confirm the exact tables in the 2021 IRC (or your local adopted edition) before swinging a hammer.
Disclaimer: These are common rules of thumb pulled from the 2021 International Residential Code summary text. They are not a substitute for reading the actual code section or hiring a licensed design professional for your jurisdiction and specific plan. Structural walls, headers, and lateral bracing must be sized by the drawings — not guessed from an estimator.
How to Frame a Wall: The 11-Step Field Process
The math the calculator runs is useless if the wall goes up bowed, out of square, or with nails in the wrong place. Here is the sequence a professional framing crew runs for a single wood-framed wall, from plate chalk line to hand-off for sheathing.
Get measurements & snap the plate line
Confirm the wall length and stud height off the plans. Chalk a straight sole-plate line on the floor slab or subfloor; double-check corners are square with a 3-4-5 triangle or a laser.
Gather material & kit the plates
Cut one bottom plate and two top plates to the exact wall length. For walls longer than your stock board, lap top-plate joints by a minimum of 4 ft and offset the two layers so no two joints land on the same bay.
Lay out O.C. marks on the plates
Hook your tape on the end of the bottom plate. Strike lines every 16″, 19.2″, or 24″ all the way down. Transfer the same marks to both top plates by stacking them. Mark each line with two V-shaped arrows so you know which side the stud center lands on.
Mark rough openings on the plate layout
Use the RO sizes from the window/door schedule. Mark king studs full-height, then mark the trimmers inside, the header length between trimmer tops, and (for windows) the rough sill and sill cripples below.
Cut studs, kings, jacks, cripples, and headers
Cut field studs to the common height (precuts for 8-ft, 9-ft, and 10-ft walls save time). Cut jacks shorter by exactly the header depth. Build headers as doubled-up 2× stock with a ½″ plywood skin or specified engineered LVL.
Assemble the wall flat on the deck
Lay bottom plate and one top plate on edge, parallel. Drop studs, kings, jacks, cripples, and headers between them at the marked lines. Drive two 16d (3½″) nails through the plate into the end of each stud — that's a face-nail connection.
Square, plumb, and stand the wall
Measure both diagonals of the framed wall; shim or tap until they read equal (within 1/8″). Nail a temporary diagonal brace across the face, then lift the wall with a crew and set the sole plate onto the chalk line.
Attach sole plate to the floor
On concrete, use powder-actuated pins or ¼″ wedge anchors every 4 ft and within 12″ of ends. On wood subfloor, toenail or face-nail with 16d common nails into the joists wherever they align.
Plumb, brace, and nail the second top plate
Shoot a level laser or use a 6-ft level to bring the wall dead plumb; set temporary 2×4 braces every 8–10 ft, nailing into stakes or floor blocking. Then face-nail the doubled top plate on, lapping joints ≥ 4 ft and tying corners and wall intersections.
Install blocking, fire stops, and let-in bracing
Add mid-height solid blocking or approved fire-stop material per R302.11 where bays run taller than 8 ft. Nail let-in 1×4 or metal L-straps on exterior corners and long wall runs for required lateral bracing.
Nail corners, intersections, and hand-off to the next trade
Build up corner posts or add the intersection ladder blocking. Walk the wall with a gun, spot-check 16d nail counts per plate connection, and mark any header or jack adjustments. Then the wall is ready for sheathing, MEP rough-in, or drywall.
Framing Nails Schedule & Essential Toolkit
Under-nailing a plate connection and over-nailing a header can both fail inspection — the code is specific about which nail, how many, and in many cases which angle. These schedules match the IRC nailing schedule for conventional platform framing.
Nail Size & Count per Connection
| Connection | Nail Size | Penny | Count Rule |
|---|---|---|---|
| Stud to plate (face nail, each end) | 3½″ × 0.131″ | 16d common | 2 per end (stud end → plate face) |
| Stud to plate (toenail, each end) | 3″ × 0.120″ | 10d sinker | 3 toenails per end, angled through stud into plate |
| Double top plate lap splice | 3½″ × 0.131″ | 16d common | 2 nails every 16″; 1 nail each end within 12″ of splice |
| Header to king / jack stud | 3½″ × 0.131″ | 16d common | min. 2 nails per end into jack; toenails into king |
| Blocking mid-bay / fire stop | 3″ × 0.120″ | 10d sinker | 2 toenails each end into adjacent stud |
| Sheathing (OSB / plywood) to studs | 2″ or 2½″ | 8d ring-shank or screw | every 6″ on edges, every 12″ in field (per code) |
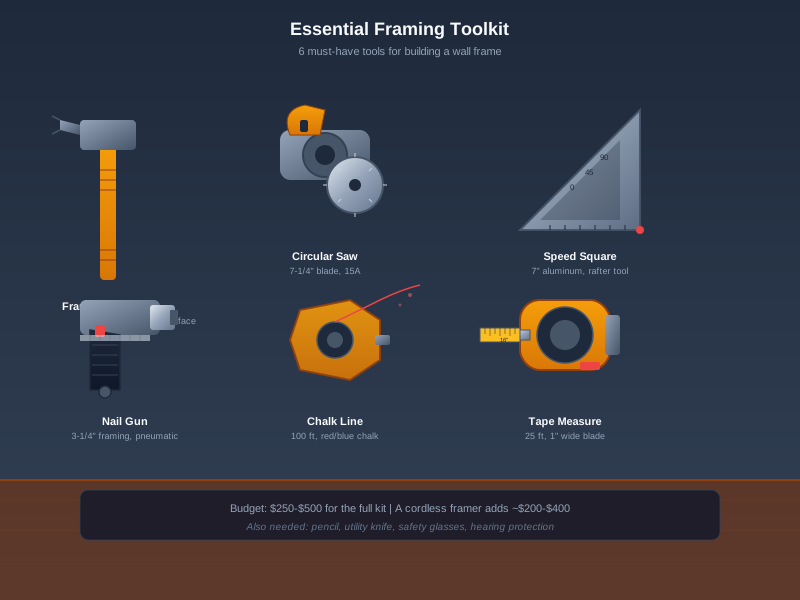
Core framing toolkit from the nailer back to the chalk line.
Essential Framing Toolkit (Carpenter-Belt Setup)
Framing Square (Steel Square)
L-shaped metal tool with a 24″ blade and a 16″ tongue meeting at 90°. Used for laying out O.C. marks, cutting rafter angles, and verifying square corners.
Pro tip: Use the body edge to lay out every 16″ or 24″ stud mark in a single long run — it's faster and straighter than a tape alone.
Speed Square (Rafter Angle Square)
Triangular 7-inch aluminum square that lives in a toolbelt pouch. Combines a try square, mitre square, protractor, and line scriber in one.
Pro tip: Swivel the edge to the pitch mark for quick rafter cuts, or use the flange to hook a 2× and draw a perfect 90° cut line every time.
Chalk Line (Snap Line)
Marks long straight lines on floors, plates, and sheathing by snapping a taut, chalk-dusted cord.
Pro tip: For plate layouts over 20 ft, strike two reference lines — the sole-plate line AND a parallel offset at 3 ft — so you can quickly re-square the wall after standing it.
6-Ft Level & Laser Plumb
Check studs and walls for plumb; the laser level projects a 360° horizontal line for aligning top plates across many studs at once.
Pro tip: A 6-ft level will catch crowns and bows that a 4-ft level misses — use it on every third stud and always on king studs flanking openings.
Pneumatic Framing Nailer
Drives 16d and 10d clipped-head or round-head nails into lumber in 0.1 seconds per shot, dramatically increasing production.
Pro tip: Watch the depth-of-drive: if nails blow through 3-2 or bury too deep, dial the regulator down. Under-driven heads pop drywall later.
Master Calculator Entry for Walls, Roofs, Decks & Openings
Treat this page as your master calculator entry for wood-stud wall takeoffs. The default mode handles stud count, plates, linear lumber, board feet, and sheathing in a single pass. When you move past a single wall segment, follow the links below into the dedicated specialty tools so each calculation keeps its own assumptions, units, and waste factor instead of forcing everything into one generic formula.
Why a single master calculator works best as an entry, not a dump
A master calculator that tries to mix wall stud math, roof rafter geometry, deck beam spanning, and rough-opening headers in the same input panel usually gets two or three of them wrong. The correct workflow is: use this page for any vertical wood-stud wall run, then jump to the dedicated calculator for the next subsystem (roof, deck, opening, nails) with its own defaults, code table, and FAQ. That split keeps numbers auditable and avoids the classic takeoff mistake of sharing a single “global waste%” across subsystems that waste material very differently.
If you landed here typing framing calculator home depot or a generic framer calculator query, the two companion links below cover the next two steps most users actually need.
Next-step calculators & cost reference
- 1Framing Calculators Hub — collection view of every tool for a whole-project takeoff, useful when you are jumping between stud count, rafter length, headers, and nail order quantities.
- 2Framing Cost Calculator — turns the takeoff quantities into a material + labor + overhead number per sq ft, for users who need a framing estimator app style output instead of a pure stud count.
- 3Wall Framing Diagram Guide — covers framing layout, planning, software comparisons, and plasterboard/drywall lining differences in detail.
- ♯Quick stud-count lookup (16″ & 24″ O.C.) — for the “how many studs for X ft wall” crowd who only want a number and a sanity check before heading to the yard.
All Calculators
Every interactive tool in one place — wall studs, roof geometry, deck framing, material takeoffs, and 2026 cost estimators. Newest tools appear first.
Deck Cost Estimator
Deck cost estimator for 2026: pressure-treated, cedar, composite and Trex pricing for 12×12 to 20×20 decks, with railing, stairs, lighting, flashing and per-square-foot totals.
Concrete House Cost Calculator
Concrete house cost calculator for 1,000–3,000 sq ft homes: slab-on-grade, crawl space, basement and ICF prices broken into concrete volume, rebar, forms, insulation and labor.
Stud Count Calculator
Stud count calculator: enter wall length once to see studs at 16, 19.2 and 24 inch O.C. side by side, with quick lookup tables for 8 to 24 foot walls and opening extras.
Project Calculators Hub
Free project calculators for every DIY and home improvement job: walls, sheds, decks, floors, partitions, paint and roofing, with cost benchmarks and a takeoff tool for each category.
Rake Wall Calculator
Rake wall calculator: enter wall run, eave and ridge height or roof pitch to get every gable stud length, bevel cut angle and top/bottom cut direction, with SVG diagrams.
Wood Cost Calculator
Wood cost calculator with 2026 lumber prices by species and grade: SPF, Douglas fir, hem-fir, cedar and redwood per-stick, per-board-foot and per-sq-ft framing costs, plus MBF conversion.
Framing Labor Cost Calculator
Labor-only framing cost calculator: crew rates × intensity factors → $/sq ft and $/linear ft, with 2026 role wage matrix and regional benchmarks.
Construction Calculator
Bilingual construction calculator: building square feet (rect/L/U), net wall area with opening deductions, top-floor load reference + framing myth FAQ.
Home Depot Material Calculator
Big-box material estimator cards: lumber, pavers, fence, tile, deck, shingle and flooring quantities with 10–15% waste and 2026 reference price bands.
Metal Stud Estimator
Steel stud wall calculator: track, stud count, weight, screws and board area by gauge (25/20/18/16) and spacing, plus commercial vs residential labor hours.
Lumber Calculator
Universal lumber calculator: 2×2–2×12, 4×4, 6×6 in 8–16 ft lengths. Pieces, board feet, bundles and cost by wall run, area, or piece count.
Building Material Estimator
Whole-house building material estimator: lumber, sheathing, nails, wrap, insulation and roofing takeoff by sq ft with 2026 $/sq ft cost benchmarks.
Rough Opening Calculator
Rough opening calculator for windows and exterior doors: standard RO size charts, header sizing by span, king/jack/cripple takeoffs, and clearance rules.
Siding Calculator
Siding calculator with 2026 Home Depot-led reference prices: vinyl, fiber cement, wood lap and engineered squares, J-channel, corners, and installation labor ranges.
House Framing Cost
House framing cost per square foot in 2026: 1,000 to 3,000 sq ft benchmark bands by story count, basement, and region, plus commercial vs residential wood framing rates.
Wall Framing Cost
Wall framing cost per square foot and per linear foot in 2026: 2x4 vs 2x6 partitions, opening counts, framing plus drywall pricing, and a 2026 benchmark comparison.
Wall Framing Calculator with Windows & Doors
Wall framing calculator with windows and doors: stud count, king/jack/cripple detail, headers, 16/19.2/24 O.C. auto conversion, and OSB sheathing sheets for any wall with openings.
Framing Lumber Prices
2026 framing lumber price list: 2x4 to 2x10 by length for SPF, SYP and Douglas fir, plus Home Depot vs Lowe's vs local lumber yard total cost comparison.
Subfloor Calculator
Subfloor calculator: enter room size, joist spacing and openings to get joist count, rim joists, blocking, T&G sheet count with waste, glue and screws.
Shed Calculator (Material Takeoff)
Shed calculator for 8x10, 10x12 & 12x16 storage sheds: studs, joists, rafters, sheathing and fasteners in one printable takeoff with lean-to or gable roof.
Framing Nails Calculator
Framing nails calculator: wall dimensions and spacing to nail count and boxes. 16d/10d/8d specs, per-wall breakdown, pneumatic vs hand, whole-house.
Garage Door Rough Opening Calculator
Garage door rough opening calculator: door size to rough opening, header, king/jack studs. Standard sizes, LVL headers, framing components, clearance.
Roof Framing Calculator
Roof framing calculator: span and pitch to rafter length, plumb cut, birdsmouth. Pitch coefficient table 3/12-12/12, rafter vs truss, ridge, hip, OSB sheathing.
Deck Framing Calculator
Deck framing calculator: joist count, spacing, beam size, and lumber takeoff. Includes joist span tables, beam selection, decking coverage, and hardware list.
2x12 Lumber Calculator
2x12 calculator for headers, beams, and floor joists. IRC span tables, beam load capacity, board feet, and LVL vs GLB cost comparison for 2x12 lumber.
2x6 Wall Framing Calculator
2x6 calculator: stud count, board feet, and insulation cavity volume. Includes 2x6 span table, R-19/R-21/R-23 insulation, climate zone guide, and OVE savings.
2x4 Stud Calculator
Dedicated 2x4 stud calculator and procurement guide: input wall length to get stud count, boards, and board feet. Includes actual size conversion, 8'-16' wall quick counts, bundle economics, and span table.
Metal Stud Framing Cost
Steel and metal stud framing cost analysis: gauge-based pricing per linear foot, steel vs wood cost comparison matrix, commercial vs basement application scenarios, and O.C. spacing cost impact.
Framing Cost Calculator
Total project framing cost estimation: per-sq-ft cost matrix by house size, regional labor rates, material vs labor split, basement and interior wall framing costs, and DIY vs contractor comparison.
All Guides & Articles
Deep-dive guides on construction calculations. Master the formulas, conversion tables, and practical estimation methods used by professional contractors.
Free Framing Calculator FAQs
22 FAQs covering stud counts, lumber choice, spacing, nails, waste, permits, and how this free framing calculator compares to paid tools.
How many studs do I need for a wall?▼
What is the difference between 16" O.C. and 24" O.C. framing?▼
Why is the top plate doubled?▼
How do I calculate board feet for framing?▼
What is a raked wall and how does the rake angle affect lumber?▼
How many sheathing sheets do I need for a wall?▼
Should I order 8 ft, 10 ft, 12 ft, or 16 ft boards?▼
How many studs per linear foot of wall?▼
Should I frame exterior walls with 2×4 or 2×6?▼
How many studs come in a bundle?▼
What is a pre-cut stud, and why is it 92-5/8 inches?▼
Do I need a permit to frame an interior wall?▼
What size nails and how many do I use for framing connections?▼
What is a framing square and how do I use it?▼
How much waste should I add to my framing lumber order?▼
How many extra studs does a corner need?▼
What is 19.2-inch O.C. spacing and when should I use it?▼
How do I use a wall framing calculator for a new-build takeoff?▼
What should a stud framing calculator show besides a raw stud count?▼
When should I use a wood framing calculator instead of doing the math by hand?▼
Is this a truly free framing calculator, or are features hidden behind a paywall?▼
Can I use this tool as a framing calculator app on my phone or tablet?▼
How many studs are in a 10 foot wall?▼
What does "on center" mean for stud wall spacing?▼
How much material do I need to frame a wall?▼
How does a wall area calculator work for sheathing and drywall?▼
About This Framing Calculator
This framing calculator estimates vertical stud count, top and bottom plate boards, linear lumber, board feet, wall area, and sheathing sheets for wood-framed walls. Switch to Advanced Settings to enable the Blocklayer-style interactive 2D wall layout, rake-wall (gable end) calculations, and sheathing rip-cut sizing. Works in both imperial (feet, inches) and metric (meters, millimeters) units.
What It Calculates
- Vertical studs: Count based on wall length, O.C. spacing, and end/corner configuration.
- Top plate boards: Doubled top plate length divided by stock board length, with rake correction.
- Bottom plate boards: Single sole plate length divided by stock board length.
- Linear lumber & board feet: Total linear footage and board feet across studs and plates (advanced mode).
- Sheathing: Full sheet count plus the exact rip-cut width of the final panel (advanced mode).
- 2D wall layout: Vector diagram of studs, plates, and sheathing, drawn to scale or stretched for clarity (advanced mode).
Accuracy & Safety
Results are for general planning and material estimating only and do not constitute engineering or structural design advice. Actual quantities vary based on openings, header sizes, corner detailing, and local building codes. Structural walls should be reviewed by a qualified professional.